
Today I am sharing a few really pretty stitches that I have enjoyed using in some of my patterns. They are called the Cross Cluster Stitch, and the Beginning Cluster Stitch. These stitches will give your crochet projects a fun texture.
The Beginning Cluster stitch is used at the beginning of a row, and so I am sharing it first. Scroll down just a bit and you will find the Cross Cluster Stitch.
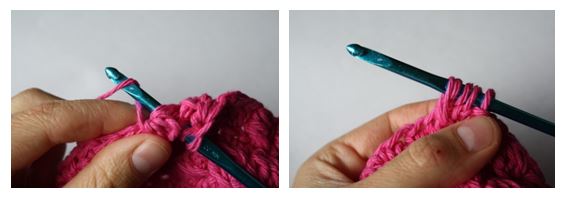
Beginning Cluster:
Ch 3

Wrap your yarn around your hook

Insert your hook in the same st

Pull up a loop (you will now have 3 loops on your hook)

Wrap your yarn around the hook and pull through 2 loops (you should now have 2 loops left on your hook)

Wrap your yarn around your hook and insert it in the same stitch

Pull up a loop (you will now have 4 loops on your hook)

Wrap your yarn around your hook and pull through 2 loops (you will now have 3 loops left on your hook)

Wrap your yarn around your hook and pull through all 3 loops on your hook. You have just made a beginning cluster!

Cross Cluster:
Wrap your yarn over your hook and insert it in the stitch indicated

Pull up a loop (you will now have 3 loops on your hook)

Wrap your yarn over your hook and insert it in the stitch indicated

Pull up a loop (you will now have 3 loops on your hook)

Wrap your yarn around your hook and pull through 2 loops on your hook (you will now have 2 loops on your hook)

Wrap yarn over your hook again, insert it into the same st, pull up a loop (you will now have 4 loops on your hook)

Wrap your yarn around the hook, pull through 2 loops (you will now have 3 loops on your hook)

Wrap your yarn over, and insert it in the previous stitch (the one you just skipped, where the arrow is)
 Pull up a loop (you will now have 5 loops on your hook)
Wrap your yarn around your hook and pull through 2 loops (you will now have 4 loops on your hook)

Now, wrap your yarn around your hook and pull through all 4 loops on your hook. You have now made a cross cluster!

I will be sharing a free crochet project using this stitch very soon!
I used this stitch for my Hailey Newsboy Cap Pattern, and for my Hailey Diaper Cover Pattern. I am sure you will probably see it in future patterns as well. Have a great day everyone!


Wrap yarn over your hook again, insert it into the same st, pull up a loop (you will now have 4 loops on your hook)

Wrap your yarn around the hook, pull through 2 loops (you will now have 3 loops on your hook)

Wrap your yarn over, and insert it in the previous stitch (the one you just skipped, where the arrow is)


Wrap your yarn around your hook and pull through 2 loops (you will now have 4 loops on your hook)

Now, wrap your yarn around your hook and pull through all 4 loops on your hook. You have now made a cross cluster!
I will be sharing a free crochet project using this stitch very soon!
I used this stitch for my Hailey Newsboy Cap Pattern, and for my Hailey Diaper Cover Pattern. I am sure you will probably see it in future patterns as well. Have a great day everyone!

Comments
Post a Comment